


How do you add an exit pop-up form in Webflow?

In this tutorial, Sandro, cofounder of the Gemeos Webflow agency, shows you how to add an exit pop-up form in Webflow.
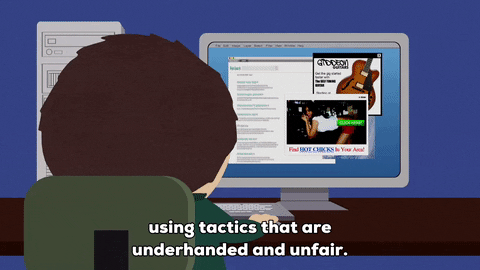
Why add an exit pop-up form to your website?
Adding an exit pop-up form to your website can be useful for several reasons:
- Reduce bounce rate: An exit pop-up can grab the attention of visitors who are about to leave your site, encouraging them to stay longer or explore more.
- Increase conversions: By offering a special deal, a discount, or an incentive, an exit pop-up can convert potential visitors into customers.
- Collect information: Email forms in exit pop-ups let you collect valuable information about visitors, such as their email addresses, for future marketing campaigns.
- Gather feedback: An exit pop-up can include a quick survey to understand why visitors are leaving the site, giving you insights to improve the user experience.
- Promote specific content: You can use exit pop-ups to direct visitors to specific content, blog posts, white papers, or other resources that might interest them.
- Increase engagement: By offering relevant content or exclusive deals, an exit pop-up can encourage visitors to interact more with your site.
- Reduce cart abandonment: For e-commerce sites, an exit pop-up can remind users about items left in their cart and offer incentives to complete their purchase.
In short, a well-designed exit pop-up can improve the user experience, increase conversions, and provide valuable data for your marketing strategy.
How does it work?
Whether it's a pop-up to collect feedback, offer a special deal, or share a lead magnet, the process is the same.
Here's how it works: you just build your pop-up (modal) in Webflow and add a small JS script to switch your modal from display : hidden to display : flex when the user moves their mouse out of the window.
1. Build your Webflow modal
Best practice: add an overlay behind it to optimize the UX (see screenshot). Be careful: you need to set your modal to "display : hidden" by default.

2. Add this script in the <body> of your page
3. Publish and test the result
Good to know
Heading
Lorem ipsum dolor sit amet, consectetur adipiscing elit. Suspendisse varius enim in eros elementum tristique. Duis cursus, mi quis viverra ornare, eros dolor interdum nulla, ut commodo diam libero vitae erat. Aenean faucibus nibh et justo cursus id rutrum lorem imperdiet. Nunc ut sem vitae risus tristique posuere.


Lorem ipsum
Lorem ipsum dolor sit amet, consectetur adipiscing elit, sed do eiusmod tempor incididunt ut labore et dolore magna aliqua. Ut enim ad minim veniam, quis nostrud exercitation ullamco laboris nisi ut aliquip ex ea commodo consequat. Duis aute irure dolor in reprehenderit in voluptate velit esse cillum dolore eu fugiat nulla pariatur.


