


Set up dataLayer in your Webflow project

What is a dataLayer?
The Gemeos Webflow agency is sharing all its tracking know-how here, with a real-world example included!
1. User identification data
Example: user ID, membership type (e.g. "premium member").
Use case: Content personalization, audience segmentation for remarketing.
2. E-commerce data
Example: product ID, product name, category, price, quantity, total cart value.
Use case: Conversion tracking, product performance analysis, ad campaign optimization.
3. Interactions and events:
Example: clicks on specific buttons, form completion, time spent on a video.
Use case: User behavior analysis, optimization of the user experience.
4. Session information:
Example: Traffic source (organic, paid, referral), device type (mobile, desktop), screen resolution.
Use case: Traffic source analysis, design optimization based on device type.
While this information varies, it follows a clear structure.
In the dataLayer, each piece of information is represented by a pair:
a name linked to its value.
Example:
"Site_currency" could have the value "EUR"
"Product_brand" could be linked to "Nike”
Pretty clear, right?
Example at Tracktor
We use the dataLayer in several ways at Tracktor
- Track conversions and their associated value
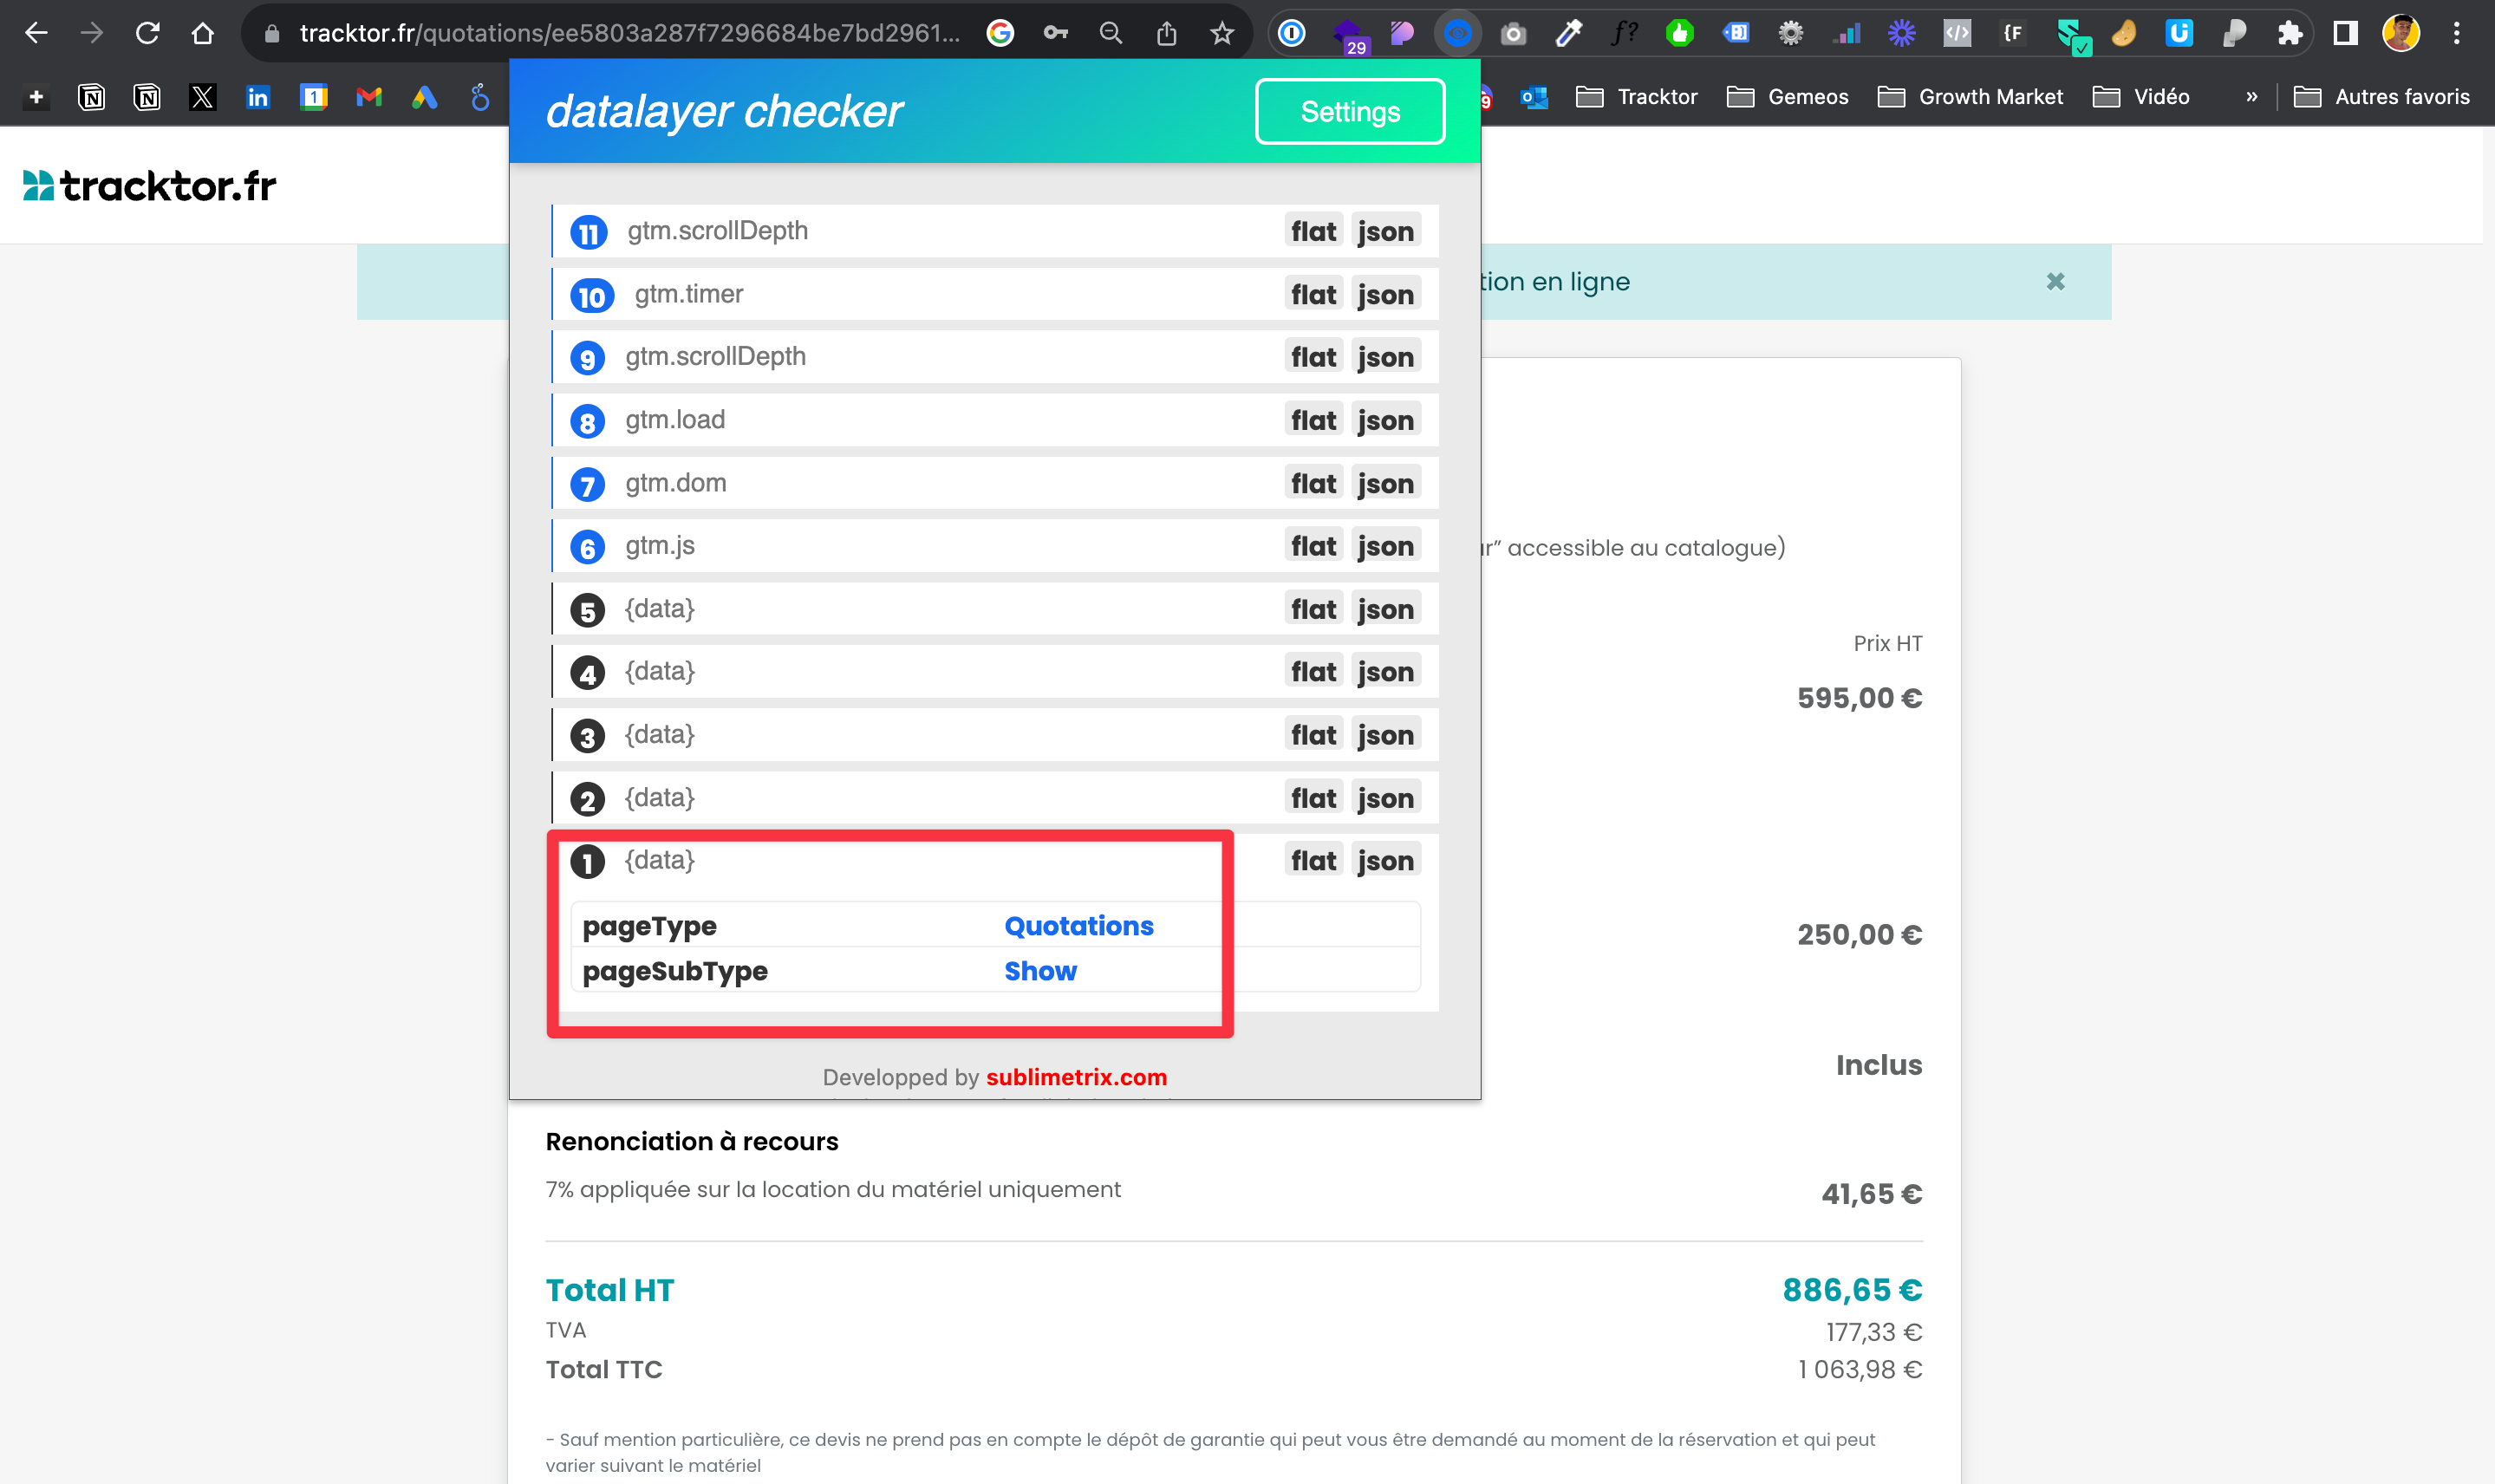
We track a conversion (quote request) when the person lands on the page with:
- pageType = Quotations
- pageSubtype = Show
By doing this, we can easily set up conversion goals in GTM, for example (see screenshot)

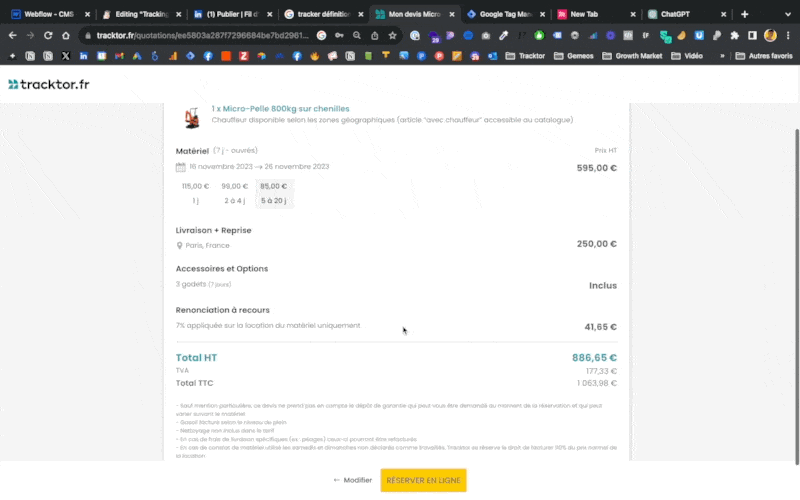
- Track quote details
Examples:
1 - The product - Super useful, for example, for product-level analysis in GA, Looker, etc.
2 - The pre-tax quote amount - Boom, a variable you can use as the conversion value for your ads and optimize for ROAS 😎


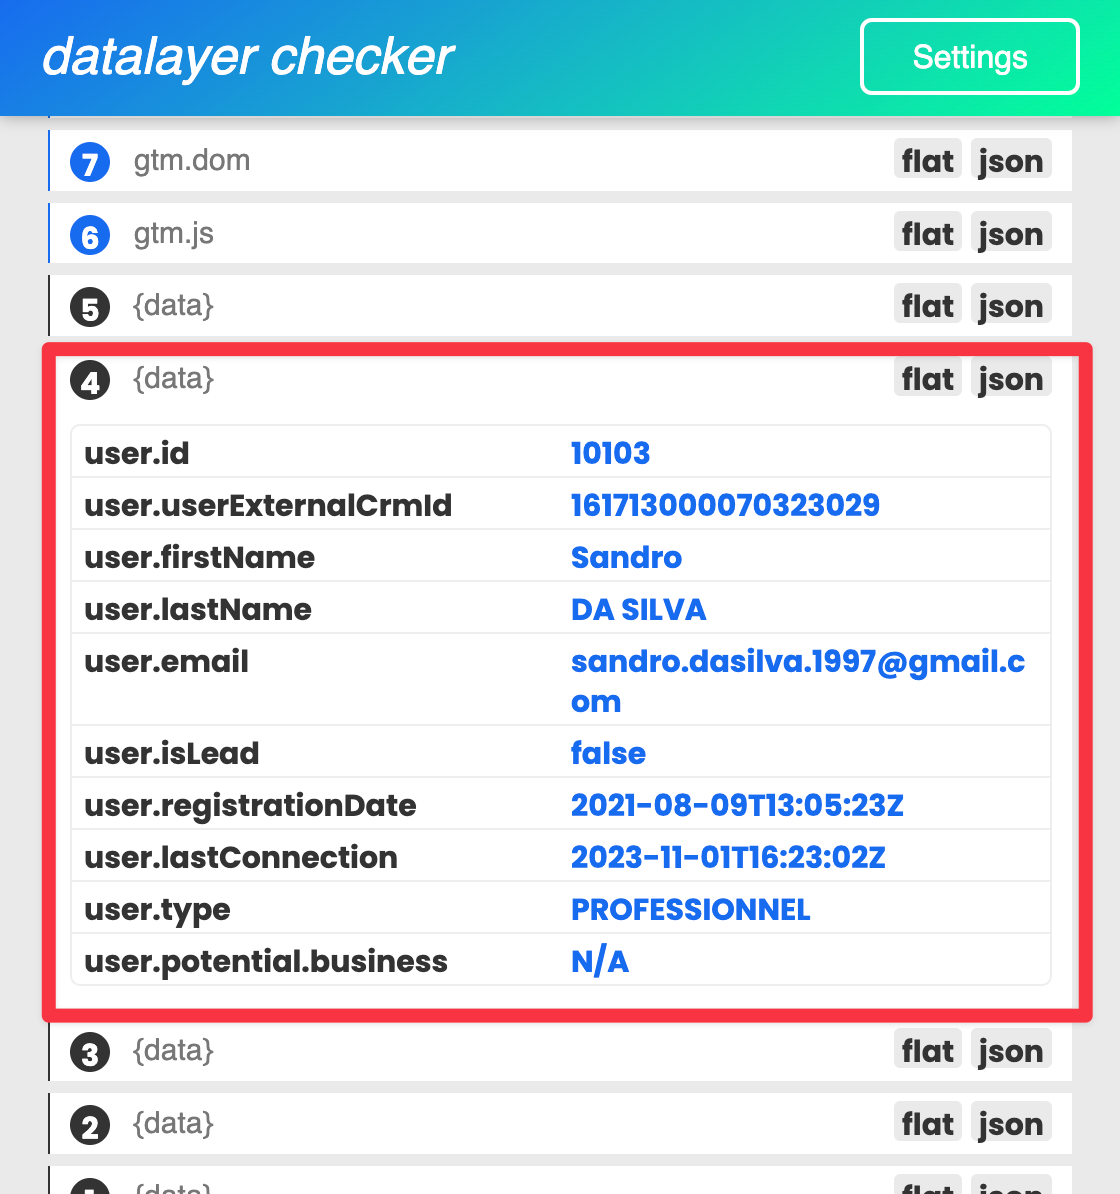
- Track user information
The best way to adapt the customer experience based on their profile
How do you set all this up in Webflow?
1. Understand the need
Before implementing a dataLayer, decide which data you want to track.
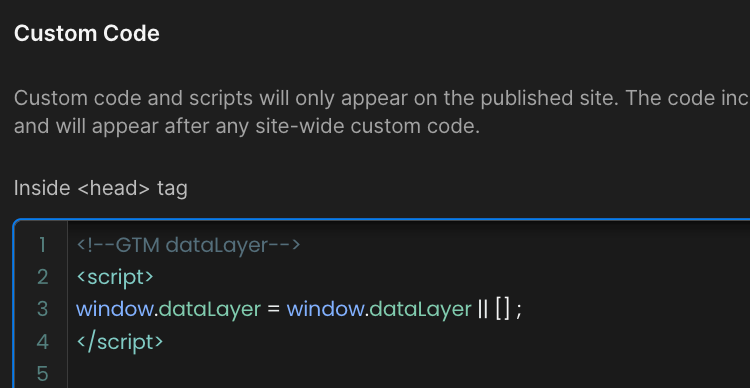
2. Add the dataLayer code to your site
Place the following code above your Google Tag Manager (GTM) code in the <head> of every page on your site:
3. Push data into the dataLayer
When a specific event happens on your site, you can "push" information into the dataLayer.
Let's take the conversion action (quote request) mentioned earlier, which looks like this:
- pageType = Quotations
- pageSubtype = Show
The code to add is:
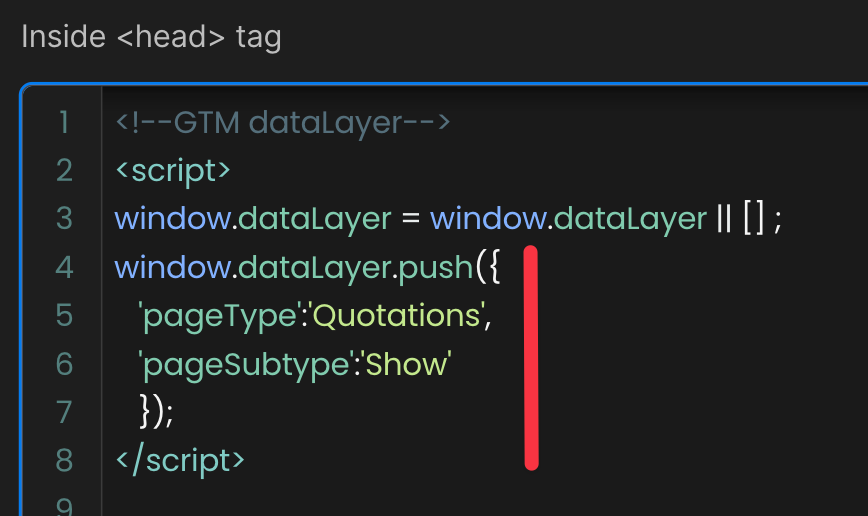
You can add as many lines as you want under pageSubtype if you want to send other data too.
4. Publish your project and test the result
Use the dataLayer checker extension to test your integration (it’s the tool I use in my screenshots above)
Tip: Add variables to your integration when needed
Example: Track product info
I use the variables available in my CMS to send data based on the product page (see screenshot)


5. Set up Google Tag Manager
Once you’ve started pushing data into the dataLayer, you can use it in GTM.
- Log in to your GTM account.
- Click "New tag."
- Choose the tag type you want to set up (for example, Google Analytics).
- To access data from the dataLayer, you can create variables in GTM.
- For example, to access the pageType you pushed earlier, create a new dataLayer variable with the variable name pageType.

- Set up your triggers to decide when the tag should fire using the event you defined during the push 😎
- And boom, you’re done 🔥
Conclusion
As you can see, the dataLayer is a powerful tool for efficiently integrating and managing dynamic data on your website, especially when paired with Google Tag Manager.
It gives you more flexibility and control over tracking user interactions and information without constantly changing the site’s source code.
To get the most out of it, you need to plan the setup carefully, add the right data, and test the configuration regularly to make sure your tracking stays accurate.
In short, the dataLayer is a key step toward advanced analysis and optimization of the user experience on your website.
Good to know
Heading
Lorem ipsum dolor sit amet, consectetur adipiscing elit. Suspendisse varius enim in eros elementum tristique. Duis cursus, mi quis viverra ornare, eros dolor interdum nulla, ut commodo diam libero vitae erat. Aenean faucibus nibh et justo cursus id rutrum lorem imperdiet. Nunc ut sem vitae risus tristique posuere.


Lorem ipsum
Lorem ipsum dolor sit amet, consectetur adipiscing elit, sed do eiusmod tempor incididunt ut labore et dolore magna aliqua. Ut enim ad minim veniam, quis nostrud exercitation ullamco laboris nisi ut aliquip ex ea commodo consequat. Duis aute irure dolor in reprehenderit in voluptate velit esse cillum dolore eu fugiat nulla pariatur.


