


Running A/B Tests in Webflow with UTM Parameters

Introduction
Webflow doesn't let you run A/B tests natively, and specialized tools are expensive. Especially since Google announced the end of Optimize.
But don't worry, the Webflow agency Gemeos found a way to A/B test your pages using UTM parameters.
Super useful for A/B testing landing pages for your ad campaigns!
Even better, by using different UTM values for your different A/B test variations, you can easily see which versions perform best.
Tutorial: how to run A/B tests in Webflow
1. Retrieve and store your UTM parameter in a variable
The first step is to grab the UTM parameter we care about. In my example, I'm going to retrieve utm_campaign so I can run an A/B test on my product page based on my Google Ads campaign.
This JavaScript code is designed to retrieve and store the value of the "utm_campaign" parameter from the page's current URL.
Here's a detailed breakdown:
- Variable initialization: The utmCampaign variable is declared without an initial value.
- sessionStorage check: The script first checks whether a value for "utmCampaign" is already stored in sessionStorage.
a. If it is not stored:
a.1. It tries to retrieve the value of the utm_campaign parameter from the current URL using new URL(window.location.href).searchParams.get("utm_campaign").
a.2. Then it stores that value, whether it came from the URL or is the default value, in sessionStorage for the user's current session.
b. If it is already stored:
b.1. It simply retrieves the value of "utmCampaign" from sessionStorage and stores it in the utmCampaign variable.
- Why use sessionStorage: sessionStorage is a way to store data locally in a browser for the duration of a page session.
That means if the user closes the tab or browser and opens it again, the data stored in sessionStorage is lost. That's different from localStorage, which persists even after the browser is closed.
Tip: make sure your script is running by testing it in your console.
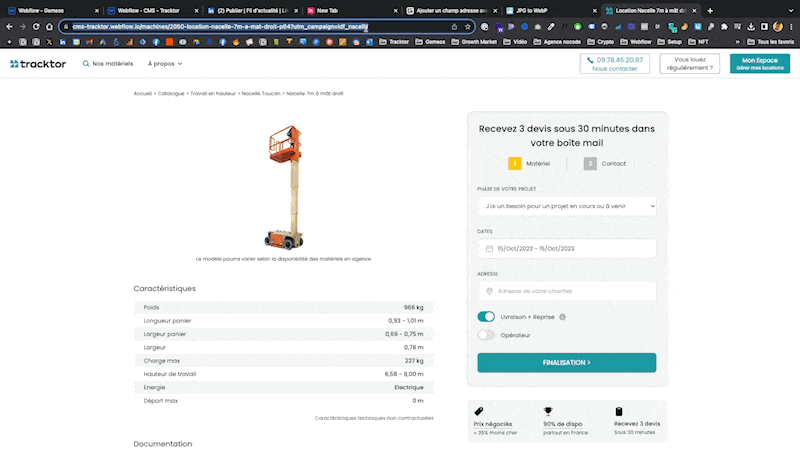
2. Implement the elements you want to A/B test on your page
In my case, I want to A/B test the right-hand block and see whether conversion is better when I use a form directly on my page versus a more classic funnel.


Make sure you give distinct classes to the elements you want to A/B test.
In my case, I use:
- "sticky-header-article-wrapper" for my Version A
- "sticky-header-article-wrapper-lp" for my Version B
3. Add this script to the <body> of your page
This JavaScript code is designed to control the display of certain elements on a web page based on specific conditions. Here's a detailed breakdown of how it works:
- "DOMContentLoaded" event listener: The script starts by adding an event listener for the "DOMContentLoaded" event.
This means the code inside the function runs once the document content (HTML) has fully loaded. - Conditions:
The script checks whether the utmCampaign variable is equal to "idf_nacelle". - Style changes based on conditions:
a. If the utmCampaign variable is equal to "idf_nacelle", the script:
a.1. Shows the element with the CSS class .sticky-header-article-wrapper-lp (by changing its display property to "block").
b.1. Hides the element with the CSS class .sticky-header-article-wrapper (by changing its display property to "none").
b. If at least one of the conditions is not met:
b.1. Hides the element with the CSS class .sticky-header-article-wrapper-lp.
b.2. Shows the element with the CSS class .sticky-header-article-wrapper.
Of course, feel free to add as many elements as you want to show or hide in your different versions.
All you need to do is duplicate this line:
- document.querySelector(".sticky-header-article-wrapper-lp").style.display = "block";
And replace ".sticky-header-article-wrapper-lp" with the class of your new element.
Publish and test the result

Good to know
Heading
Lorem ipsum dolor sit amet, consectetur adipiscing elit. Suspendisse varius enim in eros elementum tristique. Duis cursus, mi quis viverra ornare, eros dolor interdum nulla, ut commodo diam libero vitae erat. Aenean faucibus nibh et justo cursus id rutrum lorem imperdiet. Nunc ut sem vitae risus tristique posuere.


Lorem ipsum
Lorem ipsum dolor sit amet, consectetur adipiscing elit, sed do eiusmod tempor incididunt ut labore et dolore magna aliqua. Ut enim ad minim veniam, quis nostrud exercitation ullamco laboris nisi ut aliquip ex ea commodo consequat. Duis aute irure dolor in reprehenderit in voluptate velit esse cillum dolore eu fugiat nulla pariatur.


